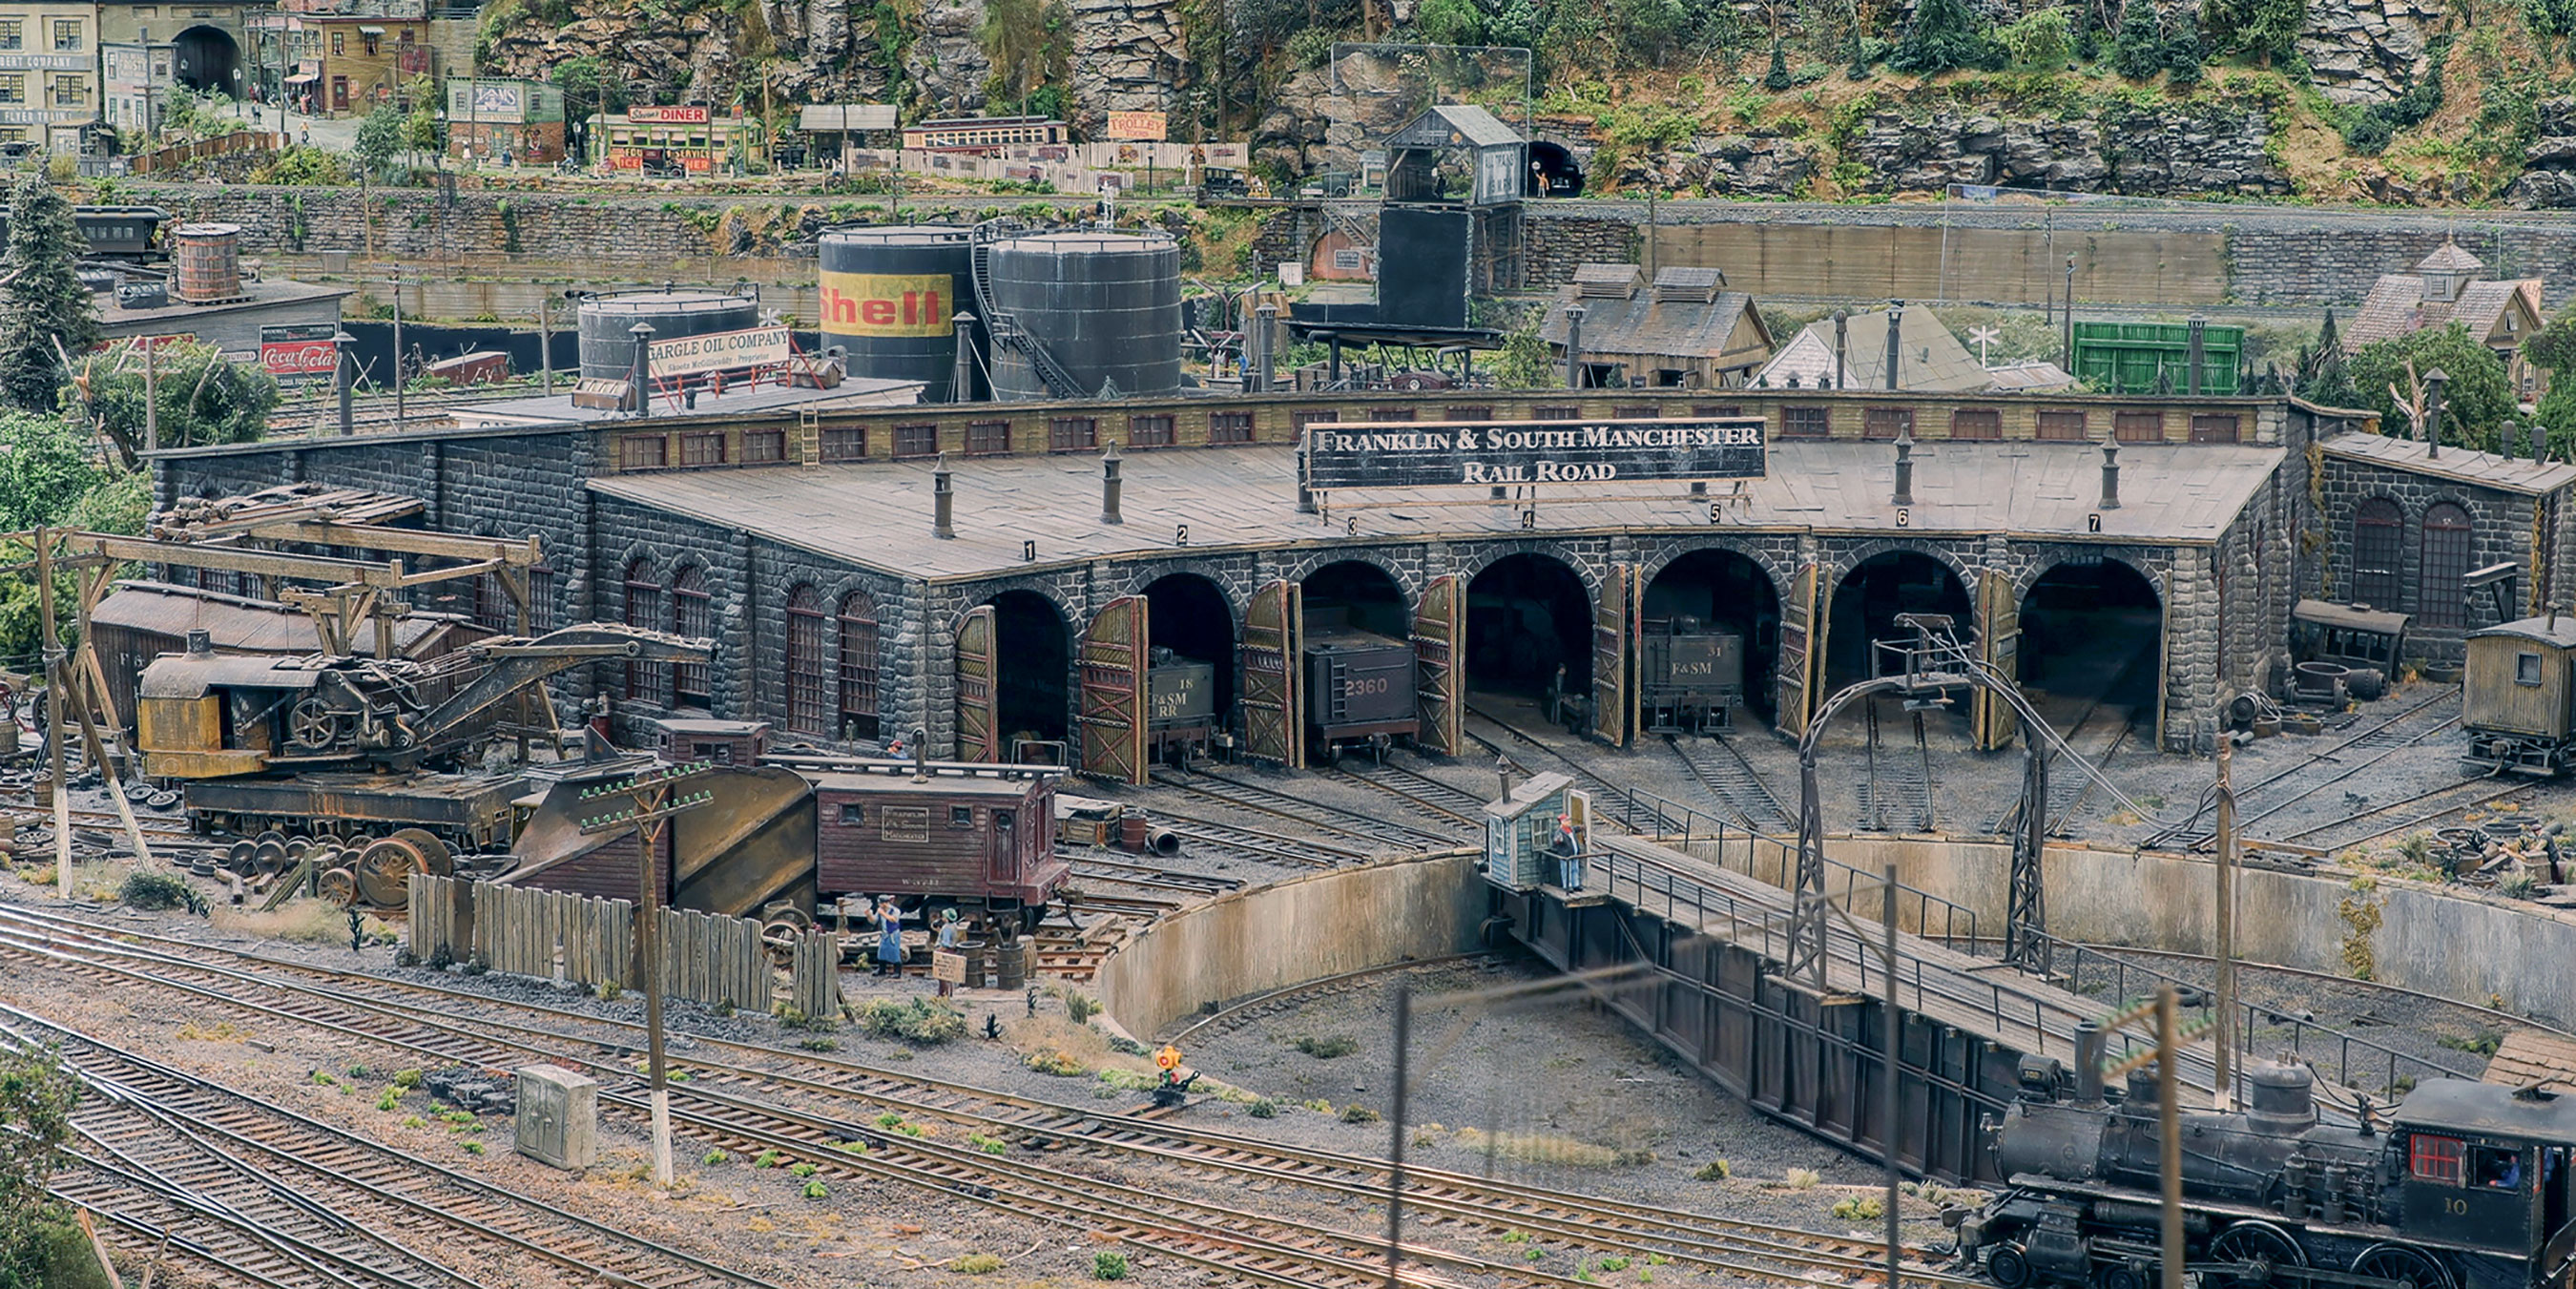
Well, a month has passed since the March issue of RMC came out. The response was great and it was an opportunity to re-establish connections with many of my old customers and acquaintances.
Wednesday, March 18, 2026
Wednesday, February 11, 2026
This just came up on the RMC digital subscription. I'm told hard copies are being mailed starting this week.
I will eventually post the photos in the article on my Flickr site. In the meantime I posted 16 new photos photos to my Flickr site that were not used for the article.
https://www.flickr.com/photos/103194951@N02/albums/72157683576799481
I used photo stacking on all my new photos. This combines multiple images focused at different distances. The result is a much sharper image from the foreground to the background.
I will eventually post the article photos here. In the meantime, I am working on finishing my main yard and the town of Millville. These are big projects requiring a lot of scheming and scratch building - so be patient!
Monday, December 29, 2025
At the beginning of December, I decided to clean up and enhance the area behind the Brick Roundhouse. I never liked the location of the track and it was in an awkward area to service. I had a spare Walthers turnout & since I had some problems with the turnout I had built years ago, I had the basis for a change.
I left some of the ties from the original track & by moving the track closer to the roundhouse, I opened up the area for an entire scene. The brick building is a modified Bennington Potters building from my H.E. Myers and Sons kit No 360. The decrepit 36" boxcar on railroad ties is a old RPI resin kit. Time was not kind to the resin & it was conveniently "pre-aged" when assembled.
Track in place and ready to start building the scene...
Below are 3 shots of the finished area. These are all photo stacked shots using a Canon R series mirrorless camera. Software used is Affinity Photo 2 for the focus stack and Adobe Photo shop for a small amount of clean-up.
Friday, October 10, 2025
Work in progress - an update
For most of this year, I have been working on finishing several areas of the layout and getting a couple magazine articles published. Many are aware that I have an article that just came out in Great Model Railroads 2026.
I recently submitted another article on my layout to Railroad Model Craftsman. This is tentatively scheduled to hit the stands around the last day of winter, 2026. I took a whole new series of photos, concentrating on this year’s work.
I’m very pleased with the shots I took and sent to RMC. I will post those on Flickr when the RMC article is published. In the meantime, I just finished a series of 17 photo stacked shots that are new or better retakes of pics I have up on Flickr.
To see these go to my Flickr site:
https://www.flickr.com/photos/103194951@N02/albums/72157683576799481/
I am really excited about the new photographs using the photo stacking program Affinity. The quality is much better. One can enlarge almost any small portion and still get a very crisp picture. A big step up from off the cuff, iPhone or handheld DSLR shots.
Also note the use of my old (23 lb) Bogen 3036 tripod. I would not use that horizontal bar with anything less than this individually leg braced tripod
Wednesday, October 1, 2025
At the beginning of the week I was putting the final touches on an article I’ve been working on for RMC for the better part of a year… simultaneously the 2026 edition of GREAT MODEL RAILROADS arrives in the mail. Inside and starting on page 44 is an article about my South River and Millville railroad. Nicely written and by my friend, Lou Sassi. Lots more excellent articles in a magazine that is nicely produced by the staff. Get one and check it out!
This article was written and shot over a year ago & in that time I've mad - the track plan is the same, but a lot of changes in the peninsula that houses Millville. Lots of changes including many new buildings ...
• I tore up the river & started over from scratch & replacing the Central Valley bridge with my own design. This can be seen on my Flickr site
• The prototype for Robinson's was replaced with the one from the first build/show diorama. This can also be seen on my Flickr site...however, looking past that to the rest of Millville, suffice to say I have been very busy.
...summing up with a quick overview - I just took some overhead shots of Millville, which are below. Maybe you can see that with the exception of the track, I tore up everything. Moving forward, I set up the area so that future aimed at finishing Millville could be done on my workbench with two removable sections. You can see these in photos - in place and removed.
Today/tomorrow I make my submission for 2016 RMC. No publication date yet, but I will try and do some shots that don't preempt the article and post them now & then.
Friday, May 16, 2025
More experiences with the WS "Static King"....
A year or so ago I finally got some decent static grass applied on my layout. Much was due to not only technique ( if you read the earlier post on "Static Grass", you can skip to the third paragraph ) but also to the applicator. After trying a couple other brands and being frustrated with the results I saw Martin Welburg demonstrate the new Woodland Scenics "Static King" Seeing an in-person demonstration validated what I had seen and learned by viewing a couple Youtube videos.
Most notable was that the other brands used a 9V battery for the charge. While this may power something like a smoke detector for a year, in an application like this you get about 5 minutes of ample power before the battery no longer provides enough "joules" to get the fibers to pierce the thin shell of glue and stand up.
With a constant plugged in power supply, I had ample power to do vast areas and so on. However, it wasn't long before a somewhat flimsy ground started to cause problems... the joint to the banana plug would break every time I used it. A rigid section ahead of the banana plug increased the pressure on the joint - further contributing to the constant breakage. I must have soldered this up a dozen times.
Electrical things are not my strong suit, so I called Woodland Scenics. They don't sell replacement grounds or suggest how you might make a fix. I quickly refocused my efforts by asking the "community" for help. I soon learned this is a common complaint and also learned what a "banana" plug is. Armed with this knowledge, I went to Amazon. I came up with two solutions, the fancy one and the not so fancy but perfectly adequate solution.
Photo One shows the problem.
Photo Two shows the the fancy solution: High end (snug fitting plug). Add wire, alligator clip and probe of your choice.
Photo Three shows the inexpensive all-in-one-solution. For $7.99 plus tax, you get two ready to use grounds. Good connection, very flexible soft wire and strong clip.
https://www.amazon.com/dp/B073ZVJDCF?ref=ppx_yo2ov_dt_b_fed_asin_title&th=1
I added a 5.5" dissecting needle for the ground :
https://www.amazon.com/dp/B07YD65KJF?ref=ppx_yo2ov_dt_b_fed_asin_title&th=1
Oh...I did just start using this and it works great!
Photo One
Sunday, March 30, 2025
A Roundhouse Story....
I’ve been accumulating stuff in my shop and under the layout for 35 years. On the eve of my 75th birthday, I decided to take a look at my Stone Roundhouse/Kit 160 diorama, which has been hiding under a corner of the layout for at least couple decades. It’s in good shape, so while it was out I cleaned it up a bit & took a couple new photographs. For years, my Flickr site has had two pics: one view of the display model and one pic of George Sellios’s build on his layout, the Franklin and South Manchester…so, I decided to better document this kit, photo - wise.
When people visit, I am often asked about how I got started making the Roundhouse kits, so I thought with this post I could not only provide some better pictures but also tell the story of how it became a kit, for anyone who might be interested.
In the spring of 1994 , I had been only making kits for a few years. I was about done selling my fifth kit, Martin Machine and was getting ready to do my sixth kit, Rugg manufacturing. I had already been talking to Sellios. He seemed intrigued with the masonry patterns I was doing. I first met George early on thanks to an intro by my good friend, the late Dick Elwell. I started going on private visits to George’s with Dick and couple of our friends. At the time, I would tag along with Dick and his long time buddy, Jimmy Smith, during private visits. Dick and Jimmy were helping cure some electrical demons. During these visits & others I would arrange to stop by to talk shop with George, which was a great opportunity.
During a visit in early 1994 he asked if I could make patterns for a round house in the image and spirit of the John Allen Roundhouse. Like George, many of us were huge John Allen fans, so it naturally piqued my interest.
I
learned that the John Allen Roundhouse had been carved out of linoleum,
of all things! So, during the first half of 1994, I did some research,
found a plan for an old Maine central roundhouse and then made the wall
patterns and molds for the side walls and the back. When I was done, I
brought a demo side wall that I made (which I still have, see the pic)
over to George’s. He really liked it and with the walls done, it was
easy enough to see how to construct and support a roof - and essentially
complete the building. George took me by surprise by asking if I might
build it for him, too! I had to decline as I was too busy doing a kit
for an early fall release. Nevertheless, George was very enthusiastic
and was insistent that it would make a great kit. I was still nervous
about “survival”, being a fledgling business and so forth. I was pretty
risk-averse and told George I thought a kit
might be too big and too expensive…and besides, I was already busy
preparing a kit for the fall....Anyway, I finally gave in and decided to
make 100 so if it was a failure, I wouldn’t be hit too badly…
Well, most people know the rest. The 100 kits sold out in a couple days. I made about 50 more and then 175 more following year (which was still not enough to fill demand). The second run sold out in less than a week. In the midst of this success, I was unwittingly becoming a glutton for punishment...after almost no rest, I proceeded to do extra stall kits during the next couple years. Again, I could never make enough. The whole venture had me run through about 3 tons of plaster. My back is still recovering (true story) from my 1994 - 5 production activities.
It took one more venture to finally give my back a long rest...After a 5-6 year break, I went through the same cycle again with the Brick Roundhouse (kit 220).
I was very proud (and still am) of the roundhouse kits. They were done with absolute precision… or as precise as one can get with a handmade item. I even calculated the width of the included glue joints to get a precision fit on the back wall. When the dust (literally ) settled, the reward (and the best part) of the roundhouse venture was seeing many of the successful builds by customers. Some years later, George built a three stall version of my brick Roundhouse for his smaller yard - something most people are not aware of. It’s actually a special Brick Roundhouse than only four people have. It’s 13 1/2 inches in depth instead of the standard 15. I built one for myself, and for the other three I made the parts for Dick Elwell, a friend of his and George Sellios.
The following are photos of the "Short" Brick Roundhouse by Dick Elwell, George Sellios and myself.
Two photos of the "Short" Brick Roundhouse on George Sellios FS&M Layout.
Photos by Al Pugliese.
Friday, March 14, 2025
Barns Barns, Barns... like my previous post, I’m sharing my observations of what’s around us. That activity plus trying to keep current on the hobby is a daily event that I never tire of….
This is our barn. I want to call your attention to several things. First, note the range of color in the slate roof. Next, check out the weathered paint. I think this is one of the nicest features. I cringe every time someone buys an old farm, rips off the slate roof and then paints over a nice patina that took decades to form.
I had a lot of work done on this barn. This sills were rotted and it was poorly supported. About 30-35 years ago I had a crew jack up the lower level, pour about a dozen 12" x 5' tall Sonotubes tubes (buried all but 6-8" in the ground) filled with concrete to support the walls/new sills and interior point loads. Cheaper than a new perimeter foundation and it allowed me to retain the stone foundation. Also, as it is close to the river, when the water gets too high during a climate event, it just runs through the foundation. I learned this trick many years ago when doing some "wash-away-first-floor" design work in Florida.
During this "rehab" most of the wood siding on the lower level had to be removed. Much was rotted, anyway. To match the upper level, I applied my modeling skills and did some "full scale modeling/weathering". Specifically, I first applied a coat of Benjamin Moore "Driftwood" stain. On top of that (using a wide brush) I dry brushed a straight white stain...Viola'!
Thursday, March 13, 2025
This walk is kind of like a tonic and a constant inspiration. Reflecting on 3/4 of a century of existence in the middle of the current Democracy crisis has not been very pleasant.... However, living in a beautiful setting that exists in a bit of a time warp is uplifting and inspiring. Here in the hill towns we are still heavily steeped in the post WW2 traditions of Democratic growth and responsibility… a better memory/feeling.
Along the way are several “sign posts” - markers & reminders of my interests. The fork in the road leads up the hill to the grand view…and beyond to Bardwells Ferry Bridge - site of a former station along the B&M and the NY, NH & Hartford lines. In the middle I am looking at the “South Station” sign, pointing down a dirt road to the right that is the old road bed for the Conway Street Railway trolley line. At the end is South Station, which was the starting point of the Conway Street Railway.
Monday, February 3, 2025
Wednesday, January 29, 2025
Recently I received a call from Lou Sassi regarding some questions on the application and coloring, etc. of my slate roofs. I will go into the process, but first, a note on coloring & materials:
Over time, the materials and finishes we use change due because of many factors. In my instruction books, one of the primary components of the coloring and weathering was the use of Prismacolor markers, most notably the "Cool Gray" series and the "Warm Gray" series. There have been some changes in the Prismacolor series - most notably the warm grays. Here is what we have now..
- The Cool Grays are available in a nice, well priced set from many sources. In general, Prismacolor has moved to sets instead of individual markers
- As for Warm Grays, they are not available in a set and individual values are hard to find. However, there are other alternatives from the ever-changing art supply world. Most notably, a complete range of warm grays from dickblick.com. Ironically, that is where I used to buy many of my individual (not available anymore) Prismacolor Warm Grays. There are other alternatives to be found elsewhere - many on Amazon, too.
https://www.dickblick.com/products/blick-studio-brush-markers/
For shingle application I use 1/2" 3M Scotch 465 ATG Premium Adhesive Transfer Tape. This is pricey, but a roll lasts me years. Best way to buy is to get a 6 pack from Uline as a group buy with some friends. Also single rolls sometimes on Ebay.
For shingles, there are several top flight kit manufacturers selling laser cut shingles. They are all great!
For the process, I can think of no better way to explain than to post the process from one of my instruction books.
Well, a month has passed since the March issue of RMC came out. The response was great and it was an opportunity to re-establish connections...
-
At the beginning of December, I decided to clean up and enhance the area behind the Brick Roundhouse . I never liked the location of the tra...
-
(This post replicates my 11/18/24 post on Facebook) I have a new batch of photos posted on Flickr: https://www.flickr.com/.../10319.../al...
-
More experiences with the WS "Static King".... A year or so ago I finally got some decent static grass applied on my layout. Much...